By setting up a Minecraft server, you can essentially create your own version of the game with unique rules and an exclusive community of your choosing.
Once you are in control of one of these private networks, you will be able to manage things like the time of day in the game, the map layout, and who gets to play with you.
Some popular examples of this include the "Autcraft" server, which is designed to be a safe venue for children with Autism, and the "Build the Earth" server, an ongoing project committed to building a 1:1 scale model of our planet in-game. Then there is the infamous 2b2t "anarchy server", which permits the use of cheats and enforces barely any restrictions whatsoever.
There are countless possibilities in terms of what you can do once you have made your own server, but getting to that stage in the first place can be quite arduous. It's not as simple as just finding a dedicated option in the main menu, and you will instead have to put in a little bit of work.
If you are willing to jump through the requisite hoops, then this guide will talk you through what you need to do.
How To Make a 'Minecraft' Server
If you just want the short version of how to create a Minecraft Server, these are the broad strokes.
- Check that your PC meets the system requirements
- Make sure that you have the latest version of Java
- Download the server software from the official Minecraft website and store it somewhere on your desktop
- Create a Windows Batch File to start the server. Use the following command format for this: "java -Xmx1024M -Xms1024M – [insert server name] nogui"
- Launch the Windows Batch File
- Accept the End User License Agreement (EULA)
- Double click on the Windows Batch File you created earlier, open Minecraft and head into the multiplayer tab. From there, click on "Direct Connection" and type "localhost" into the search bar.
For a more detailed breakdown of each of these steps, keep reading below.
Step 1: Check the System Requirements
It's all well and good downloading the server software and creating Batch files, but if your PC isn't up to the task then your efforts will be totally in vain.
It is entirely possible to host a server and play on it using the exact same machine, but it will need to be sufficiently powerful. This means that you will want to be using a desktop (rather than a notebook for instance) that meets the system requirements laid out on the official Minecraft website. In particular, it is important that you have enough RAM, GPU and disk space.
It probably goes without saying, but you should have Minecraft installed as well.
Step 2: Get the Latest Version of Java
Before you get started downloading the server software, there is one last bit of preparation you'll need to do.
Namely, you must ensure that you have the latest version of Java installed on your PC, as this is the programming language that Minecraft uses.
To do this, open the control panel app on your PC, navigate to "Programs and Features" and look for the Java icon. Once you have found it, select the update tab and click "Update Now".
If you cannot find Java at all in the control panel, then you will need to download it from scratch here.
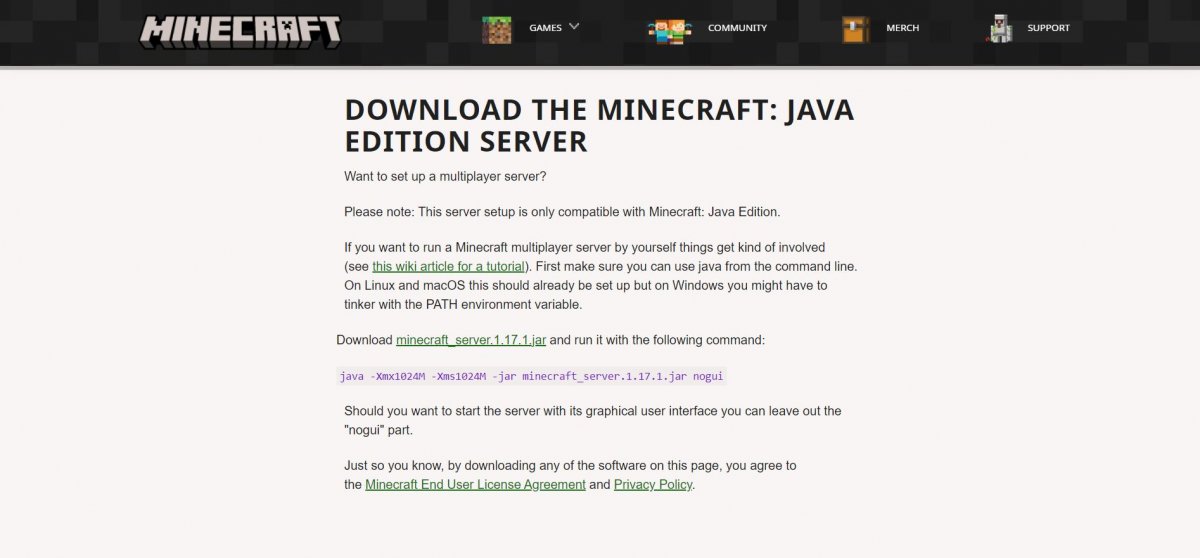
Step 3: Download the Java Edition Minecraft Server Software
With the first two steps taken care of, you can now begin setting up your Minecraft server.
To get started, you will need to download the relevant software. There are multiple sources for this online but, for the sake of cyber security, we would recommend getting it directly from Mojang Studios themselves on the Minecraft website.
Click on the link you see on that page to download the "server.jar" file. There's a good chance that your web browser might try to alert you to the file being suspicious. For instance, on Google Chrome it will say "This type of file can harm your computer".
This is no cause for alarm, as it's just because your browser cannot verify this unusual download. Rest assured that you have got the file from a trustworthy source (the Minecraft website) so it's perfectly legitimate.
Click "Keep" (or whatever the equivalent is on your browser) and then make sure that the file is stored somewhere that is easily accessible. You don't want it just hanging around loose in your downloads folder, as the rest of this process will just get messy.

Step 4: Create a Windows Batch File
This is where things start to get a little more complicated.
You will need to create a Windows Batch File to launch your Minecraft server and have it running as smoothly as possible.
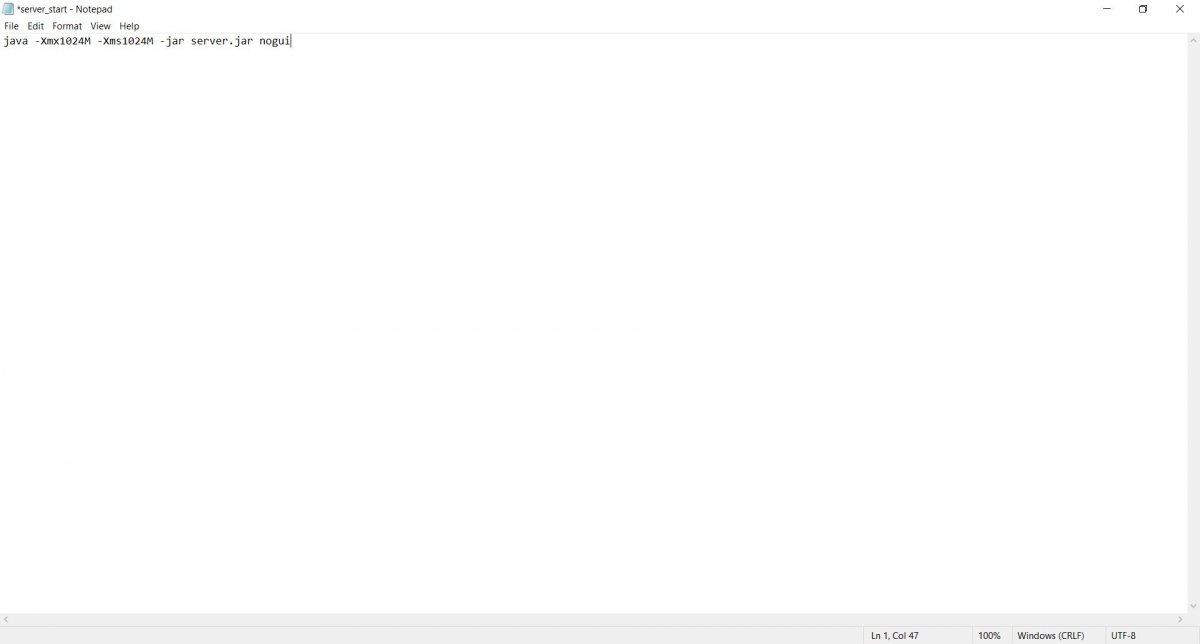
To do this, head into the folder where you have stored the "server.jar" file and then create a new text document. The latter will eventually become your Windows Batch File, but don't worry about that just yet.
Name the new text document something easily recognizable, like "run.txt" or "server_start.txt" and then open it.
In this text document, you will need to copy and paste the following command:
java -Xmx1024M -Xms1024M -jar server.jar nogui
If you are interested in what each of those bits mean, we have broken it down for you in a glossary below. Otherwise, if you're eager to keep moving, just save the text document and skip ahead to Step 5.
- Java: This just means that you are using a Java server.
- Xms1024M -Xmx1024M: This is how many megabytes of RAM you want to allocate to the server. You can tweak this number if you want
- Jar: The server file you downloaded is a jar file
- Server.jar: This is the name of the server file that you previously downloaded. It is important to make sure that this bit is right, otherwise the command will not work. So just double check that your server file is indeed called the same thing.
- Nogui: This disables the Minecraft Graphical User Interface (GUI) meaning that the server can only be interacted with from your terminal.
Step 5: Launch the Windows Batch File
Once you have set up that text document, you will then need to convert it into a Windows Batch File.
The easiest way to do this is to find the text document in your folder, right-click on it and select "rename".
From there, change the ".txt." extension to ".bat". For instance, if it was originally called "server_start.txt", you now want it to be called "server_start.bat".
You might get a warning telling you that the file could become unusable if you make this change, but don't worry about that.
When you double click on this newly created Windows Batch File it will try to run your server. However, it won't work straight away, as you still need to agree to the End User License Agreement (EULA).

Step 6: Agree to the EULA
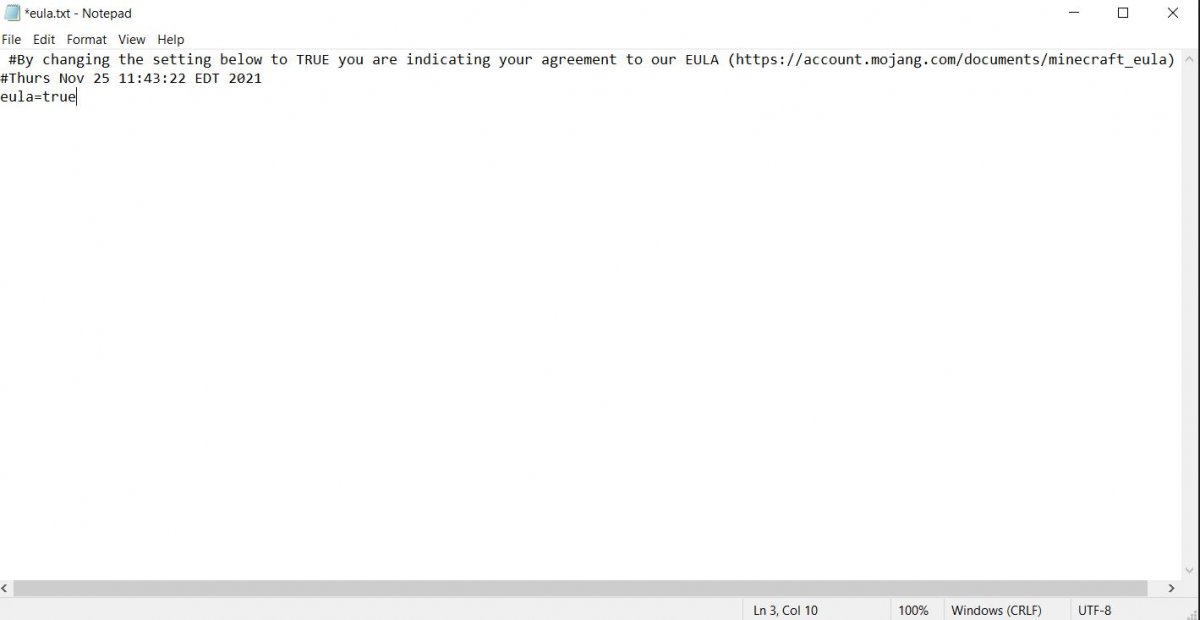
Your server will continually fail to launch until you have accepted the EULA (which can be read in full here).
You should notice that, once you opened your Windows Batch File, a few other files were generated in the associated folder. One of these is the EULA agreement.
Open this text document and then look right at the bottom. Here, there is a section that reads "eula=false". To accept the EULA, you need to edit this to say "eula=true".
Save your changes and then double click on the Windows Batch File again. This time your server should launch successfully.
Step 7: Join the Server
With your Minecraft server now up and running, you should be able to join it. As the host, you will have to do this in a slightly different way.
Open Minecraft on your PC and select the "Multiplayer" tab. From there, click on the "Direct Connection" button at the bottom of the screen and then type "localhost" into the server address search bar. Finally, click on "join server" and then you will be in the game.
If you want your friends to be able to join the server, you will need to activate port forwarding. More detailed instructions on how to do that side of things can be found here.
Minecraft is available now on PC, Xbox One, Xbox Series X/S, PS4, PS5 and even the Nintendo Switch.
Uncommon Knowledge
Newsweek is committed to challenging conventional wisdom and finding connections in the search for common ground.
Newsweek is committed to challenging conventional wisdom and finding connections in the search for common ground.